COLORIZE A BLACK-AND-WHITE photo with AKVIS Coloriage
You can add color to a grayscale or Black white photo in Photoshop using adjustment layers, masks, and brushes; however, the Coloriage plug-in from AKVIS makes colorizing a black-and-white photograph quick and automatic. You can even use Coloriage to replace the colors in a color image. You can quickly add color to
a variety of images from antique photos to hand-drawn sketches and cartoons and still maintain a very natural look.You can colorize an image with Coloriage by clicking different colors from the Colors palette or Library and painting the colors over the areas with loose brush strokes. When you press the green forward button, the software determines the borders of the various colored areas and applies the color based on the grayscale values.Your image must be in RGB mode. Click Image and Mode from the menu and click RGB. Then select AKVIS Coloriage from the Photoshop filters. You can select the colors from the Colors palette or use the Color Library
for difficult colors such as skin, hair, and lips. You can find Coloriagealong with other AKVIS filters at http://akvis.com./
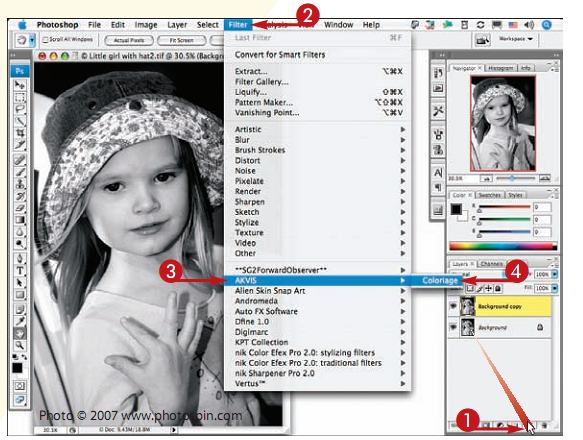
Step1. Click and drag the background layer over the New Layer button to duplicate it.
Step2. Click Filter.
Step3. Click AKVIS.
Step4. Click Coloriage.

The Coloriage dialog box appears, displaying your image at 100% in the Preview window.
Step5. Click here and drag to reduce or enlarge your preview.
Step6. Click here to select the first color, depending on the area.
Step7. Click here and drag to select the Pencil tool size to draw in the image.
Step8. Click and drag to draw in the image with the first color.

Step9. Repeat steps 6 to 8 to set all the colors to be used.
Step10. Click the Eraser tool.
Steo11.Click and drag to correct any stray marks.
Step12.Click the Run button to see a preliminary colorization.

Step13. Click the Before tab and repeat steps 6 to 11 to change any colors as needed.
Step14. Click the Run button again to view the corrections.
Step15. Click the Apply button. The final colorization is applied to the image.
Note: If the colors are too vibrant in the Background copy layer, lower the opacity of the layer slightly.
0 comments:
Post a Comment